AI-Powered Image Enhancement Tutorial: Step-by-Step Guide to Upscaling Pictures Through Stable Diffusion Technology
AI-Powered Image Enhancement Tutorial: Step-by-Step Guide to Upscaling Pictures Through Stable Diffusion Technology
Quick Links
Key Takeaways
- In Stable Diffusion WebUI, click the “Extras” tab.
- Upload the image or images you want to upscale.
- Adjust the Resize slider to choose the resolution you want.
- Choose an upscaler to use.
- Click “Generate.”
Disappointed by the low resolution of your Stable Diffusion creations? Or maybe you have older “real” photos you’d like to upscale? Stable Diffusion WebUI has tools for just that, and we’ll walk you through the process while sharing some tips we’ve learned along the way.
In this guide we’re assuming you have automatic11111’s Stable Diffusion WebUI installed and running . It’s the definitive edition of Stable Diffusion and makes upscaling (along with many other aspects of work with AI images) much more simple and intuitive compared to a standard Stable Diffusion installation .
How to Upscale Images in Stable Diffusion
Whether you’ve got a scan of an old photo , an old digital photo, or a low-res AI-generated image , start Stable Diffusion WebUI and follow the steps below.
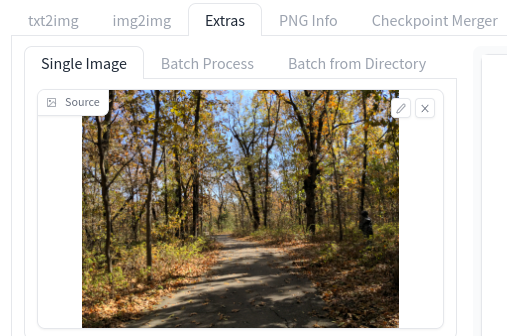
1. Upload an Image
All of Stable Diffusion’s upscaling tools are located in the “Extras” tab, so click it to open the upscaling menu.
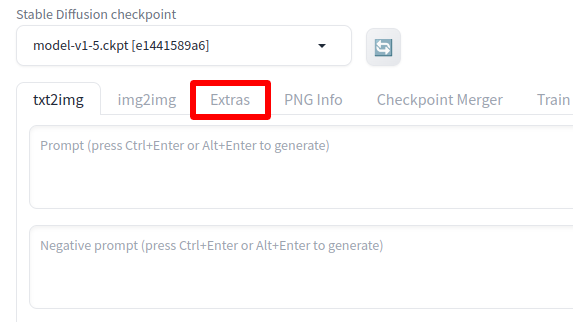
Or, if you’ve just generated an image you want to upscale, click “Send to Extras” and you’ll be taken to there with the image in place for upscaling. Otherwise, you can drag-and-drop your image into the Extras upload field.
If you have several images you want to upscale at once, switch to the “Batch Process” tab and drop several at once. In my experience, though, this doesn’t always work, and
Step 2: Choose a Size
Use the “Resize” slider to adjust how big the output image should be. By default, you’ll use the “Scale By” tab which lets you multiply the image’s current resolution by a given number. So for example, if you set it to 2 and your input image is 512x512, the image will be upscaled to 1024x1024.
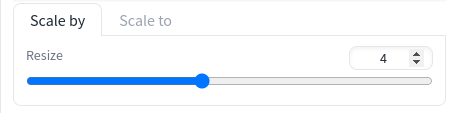
Alternatively, you can switch to the “Scale To” tab and enter a specific resolution you want. Pay close attention to the image’s current aspect ratio, and uncheck the “Crop to Fit” option if you don’t want edges cut off.
If you’re planning to make a wallpaper, keep in mind that most modern phones use a 9:16 aspect ratio , tablets use 4:3, and computers 16:9 (though ultrawide monitors go up to 21:9).
Step 3: Choose an Upscaler
Now, here’s where it’s easy to feel overwhelmed: you have at your disposal several different upscaling algorithms at your disposal, all with cryptic names, and you must choose one.
The one you should choose ultimately depends on what kind of image you’re upscaling, like a photo, a painting, anime art, or another kind of “cartoon” style artwork. Different algorithms also work at different speeds, so it may also depend on what kind of hurry you’re in.
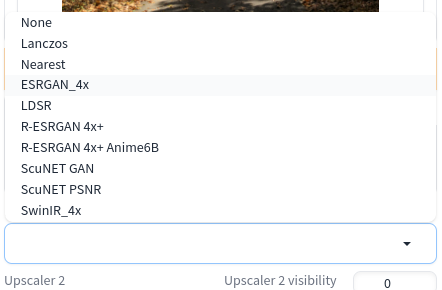
Which Is the Best Stable Diffusion Upscaler?
Experimenting with the different algorithms is the only way to know for sure exactly which of Stable Diffucion’s built-in upscalers is best for your case. That said, if you’d like a basic recommendation, these are usually good choices:
- Photos: ESRGAN_4x
- Paintings: R-ESRGAN 4x+
- Anime: R-ESRGAN 4x+ Anime6B
Step 4: Upscale!
Once you’ve got your settings in place, it’s time to upscale. Hit that big “Generate” button to begin the process.
The first time you upscale with a given algorithm Stable Diffusion will need to download the appropriate models, so expect the initial run to take extra time (which will depend in part on your connection speed).
Once upscaling is complete, you’ll find the output images in your the
`extras-images`
subdirectory of your
`outputs`
folder.
Related: How to Use Stable Diffusion to Make AI GIFs and Videos
Tips for Better Upscaling Results
If images aren’t looking quite how you expected, there are a few things you can do get better results from Stable Diffusion’s upscaling tools.
Try an Upscaler Combo
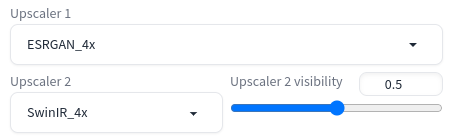
For advanced upscaling, you can select a second algorithm that will apply its effect to the same image, and the results of the two upscalers will be blended for the final product. (To be clear, a second upscaler will not double the output resolution.) This is useful if you find two different upscalers produce better results for different reasons.
For example, in my testing, I found ESRGAN_4x was best at maintaining detail, but SwinIR had less grain, while also introducing some annoying tile artifacts. I could get the best of both worlds by setting ESRGAN_4x as the primary upscaler and SwinIR as the secondary, with 0.5 visibility.
Fix Bad Aspect Ratios With Outpainting
If you have an image you want to use at a specific aspect ratio but the upscaled image is too tall or two wide to use without cropping, you can potentially fix that problem using Stable Diffusion’s “outpainting” tool . It lets you generate “more” of the image, adding imagery to the sides or the top and bottom that weren’t there before.
To get started outpainting, drop your image into the img2img input and, look for the “Script” dropdown menu and select either Outpainting mk2 or Poor Man’s Outpainting. Adjust any settings you see as necessary and then click “Generate.”
As you’ll quickly find out, outpainting well is difficult, and probably a subject for another guide, especially with complex image content like people and animals. That said, just messing around and not making too many changes I was able to generate this panoramic version of my image that, at first glance, looks half-believable.
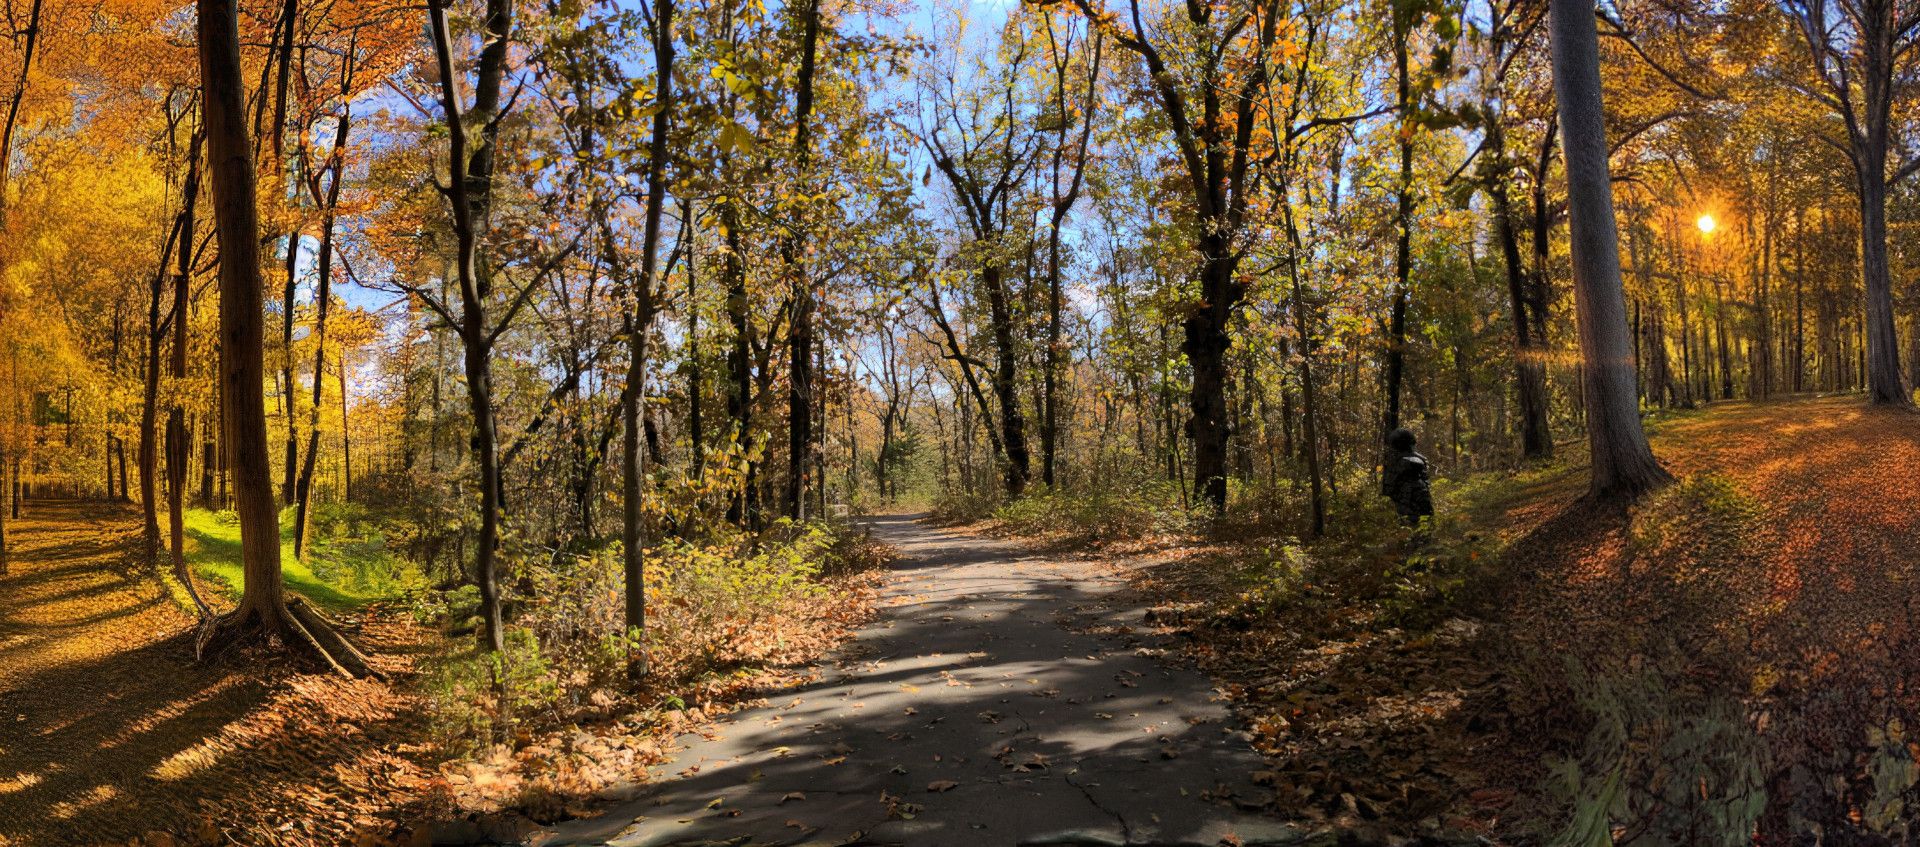
Postprocess upscale by: 4, Postprocess upscaler: ESRGAN_4x, Postprocess upscaler 2: SwinIR_4x
Restore Distorted Faces With GPFGAN or CodeFormer
If there’s a person’s face the image you’re blowing up, it can easily become distorted beyond recognition. You’ve no doubt seen some of Stable Diffusion’s rather horrific renditions of human faces, too. Either case is when you’d want to nudge the GPFGAN or CodeFormer visibility sliders. Each applies a layer of facial correction during the upscaling process to fix those spooky eyes and bizarre wrinkles.
If you’re using CodeFormer, you can also adjust the “weight” of its effect, which is sort of like controlling its level of strength (while the visibility slider is sort of like adjusting its correction layer’s transparency). The more you increase the weight, the more CodeFormer will try to correct. This can improve or degrade the final image depending on the situation. You may have to go through some trial and error to get the best possible result.
GPFGAN vs. CodeFormer for Facial Restoration
While both are capable tools, GPFGAN is generally better at restoring a face’s structure (eyes in particular), but CodeFormer is better at fixing skin textures. GPFGAN has a tendency to give human skin a strange ultrasmooth look, so if you notice that happening, try CodeFormer instead. Alternatively, combine the two and try to get the best of both worlds. Again, experimentation is key.
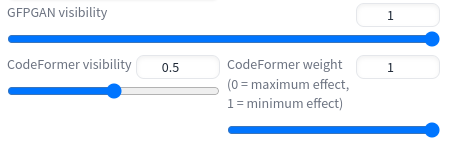
In terms of speed, GPFGAN is slightly faster than CodeFormer. So if you’re looking to make your upscaling happen as quickly possible, you’ll probably want to lean on GPFGAN.
Related: How to Make Awesome Wallpapers for Any Device With MidJourney
Also read:
- [New] Video Splitting Wins Ranking Recorder Titans?
- [Updated] Craft Professional Videos with Free Intros for 2024
- [Updated] Sculpting Images Selecting the Right Aspect Ratio
- Affordable Alternative: Exploring Virtual Reality with This Compact and Powerful VR Device From ZDNet's Top Picks
- Affordable Eyewear Alert! Could an iPhones Headset Be the Next Big Thing in Apple Accessories?
- Apple Vision Pro Review: How It Revolutionizes User Experience - Insights From ZDNet
- AR Laptops Go Mainstream: Sleeker Designs and Lower Prices Unveiled by ZDNet's New Findings
- Budget-Friendly XR Optics End Apple's Vision Monopoly, FOMO Reduction Achieved
- In 2024, HDR Software Showdown SNS vs Others
- In 2024, How Can Infinix Note 30 VIP Racing EditionMirror Share to PC? | Dr.fone
- In 2024, How to Fix iPad or iPhone 14 Stuck On Activation Lock?
- In 2024, Seamlessly Sync Your Ideas on Mematic
- L'Oréal Triumphs with Dual Accolades for Revolutionary Inclusivity in Beauty Technology at the 2023 Consumer Electronics Show - Insights From ZDNet
- Movavi Online: 제공 무료 M4A/M4R 파일 전환 서비스
- Saying Goodbye to AltspaceVR: Microsoft Ends Virtual Reality Venture, Details by ZDNet
- Tech Breakthrough Alert! A Finnish Startup's Revolutionary VR Device Poses a Threat to Apple's Dominance - The Ultimate Tool for Business Enthusiasts | ZDNET
- The Comprehensive Tutorial on Adding a Virtual Private Network to Your Apple Vision Pro Device – Boost Security and Access Unrestricted Content
- Ultimate Guide on Apple iPhone 12 Pro iCloud Activation Lock Bypass
- Ultimate Steering Control: Free Download for Logitech G29 Software on Windows Operating Systems
- Title: AI-Powered Image Enhancement Tutorial: Step-by-Step Guide to Upscaling Pictures Through Stable Diffusion Technology
- Author: James
- Created at : 2024-12-31 16:44:10
- Updated at : 2025-01-04 17:06:48
- Link: https://technical-tips.techidaily.com/ai-powered-image-enhancement-tutorial-step-by-step-guide-to-upscaling-pictures-through-stable-diffusion-technology/
- License: This work is licensed under CC BY-NC-SA 4.0.