Mastering Printer Management on Windows 10: Step-by-Step Tips and Tricks
Mastering Printer Management on Windows 10: Step-by-Step Tips and Tricks
Quick Links
- How to Add a Printer
- How to Change Printing Preferences
- How to Change Printer Device Settings
- How to Print a Test Page
- How to Set Your Default Printer
- How to Manage Your Print Queue
- How to Create Multiple Printer Profiles
- How to Set Up a Shared Printer
- How to Troubleshoot a Printer
Windows 10 has a new Settings window for configuring printers, but you can still use the old Control Panel tools, too. Here’s what you need to know about installing, configuring, sharing, and troubleshooting printers on Windows.
How to Add a Printer
To add a printer, head to Settings > Devices > Printers & Scanners. Click the “Add a Printer or Scanner” button to search for nearby printers, whether they’re hooked up to your PC or connected to the network.
You should see your printer’s name appear here. If Windows doesn’t find your printer automatically, click the “The Printer That I Want Isn’t Listed” link that appears. This opens the old Add Printer dialog, which lets you scan for older types of printers, directly connect to network printers, and add printers with custom settings.
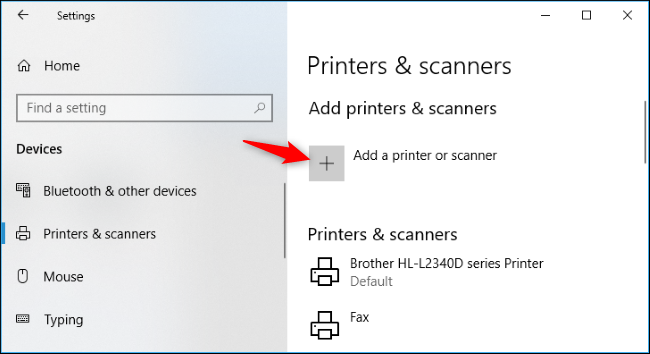
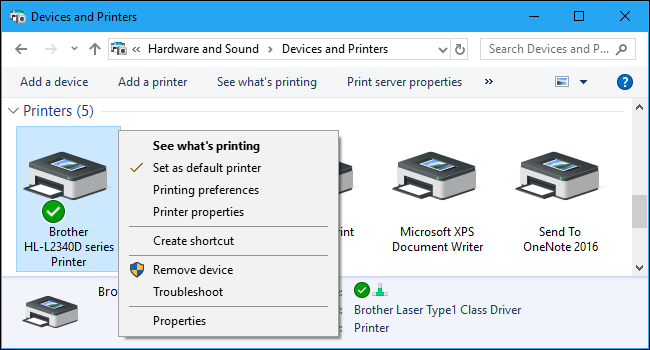
You can also use the old interface at Control Panel > Hardware and Sound > Devices and Printers. Click the “Add a Printer” button to get started.
However you install the printer, Windows will probably download the necessary printer drivers on the fly. If this doesn’t work, visit the printer manufacturer’s website to download and install the appropriate drivers or software package for your model of printer. For some printers, such as all-in-one printers, you might also need to visit the manufacturer’s website for drivers and apps that let you access the added functionality.

You can remove a printer from here, too, if you like. In the Settings window, click a printer and click “Remove Device.” In the Control Panel, right-click a printer and select “Remove Device.”
How to Change Printing Preferences
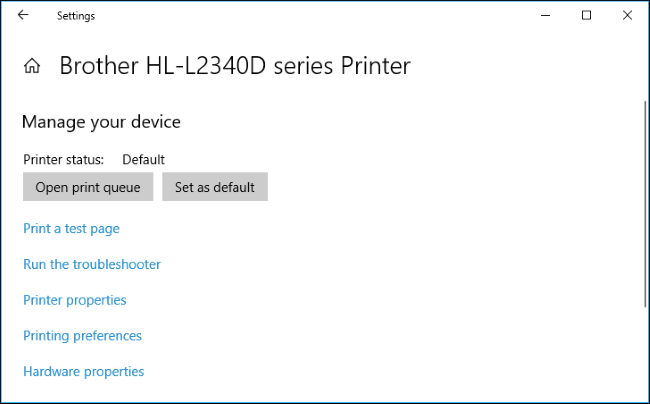
To change your printer’s settings, head to either Settings > Devices > Printers & Scanners or Control Panel > Hardware and Sound > Devices and Printers. In the Settings interface, click a printer and then click “Manage” to see more options.
In the Control Panel, right-click a printer to find various options.
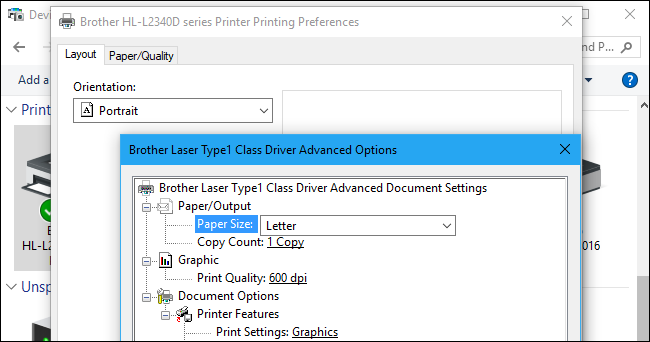
To change how the printer prints, click the “Printing Preferences” option in the Settings window or context menu. You’ll see a variety of options for controlling your prints here, and the settings you see will depend on the ones your printer supports.
For example, if you have a color printer, you’ll see options for choosing between color and black and white. You might also see options for choosing the tray from which the printer grabs the paper, selecting the orientation of the document (portrait or landscape), and changing print quality settings. Don’t miss the “Advanced” button, which offers many additional settings.
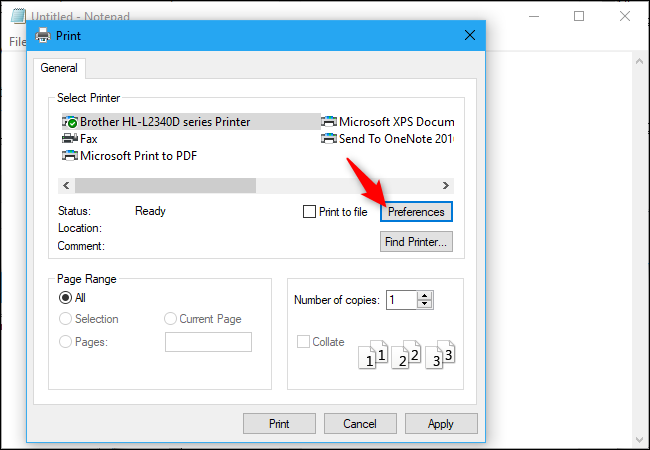
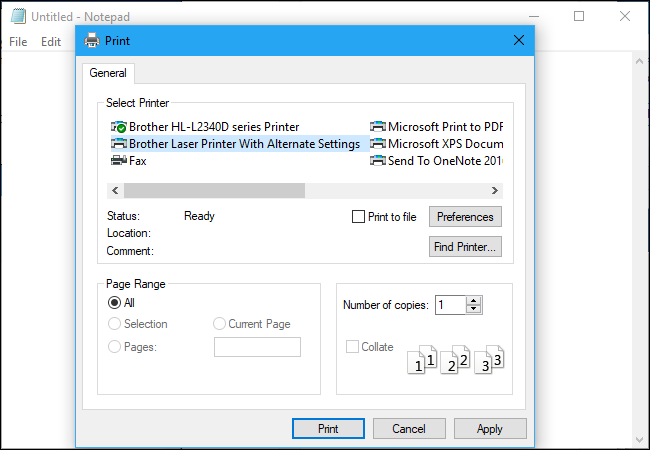
You can also access these settings while printing. Just select a printer in the Print window and then click the “Preferences” button. Note that some applications have their own print dialogs, so this option might not always be present or the window might look different
How to Change Printer Device Settings
To configure your printer device, click “Printer Properties” instead of “Printing Preferences” from the context menu after right-clicking a printer.
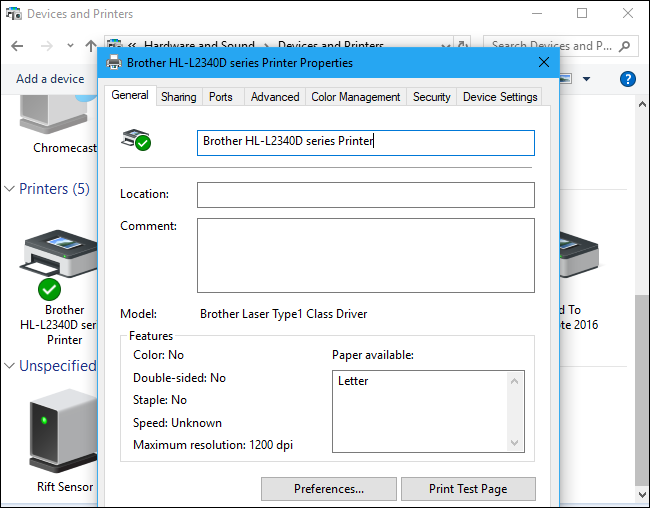
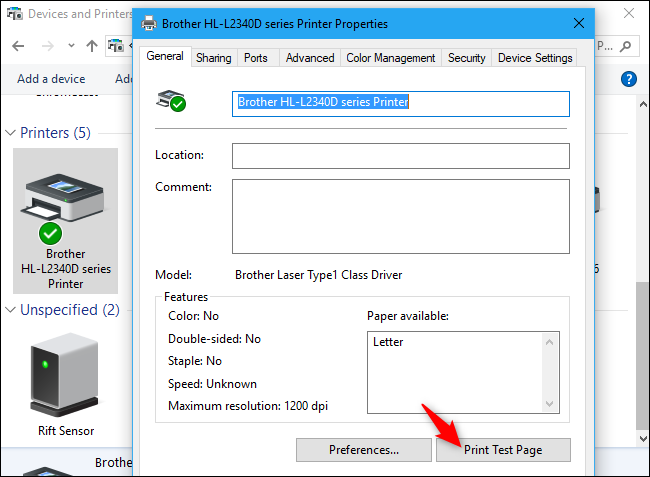
The General tab of the properties window provides information about the printer’s features and what drivers it’s using. You can change the printer’s name or add location details and comments. For example, you might want to enter a location like “Main Office” or “Second Floor Copy Room” so people can see exactly where a shared network printer is. The “Print Test Page” button here lets you quickly print a test page.
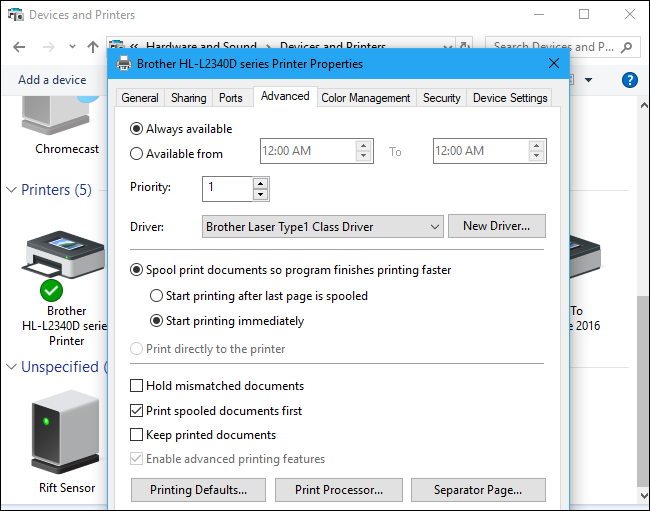
On the “Advanced” pane, you’ll even see an option that lets you choose when the printer is available. For example, if you only want to use your printer during business hours, you could select 9 am to 5 pm here. People wouldn’t be able to print to the printer outside of your selected hours, which is especially useful if you’ve configured it as a network printer and don’t want people printing to it during off hours.
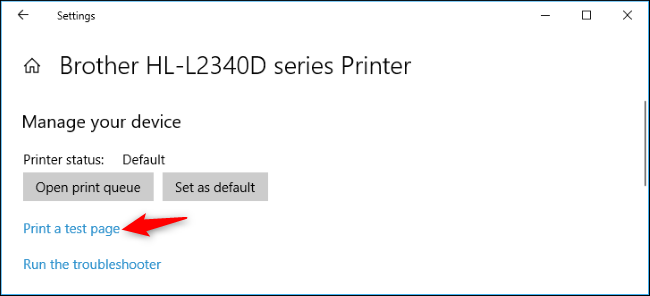
 How to Print a Test Page
 How to Print a Test Page
You can quickly check whether your printer is working and configured properly by printing a test page. Locate the printer in Settings > Devices > Printers & Scanners, click it, click the “Manage” button, and click the “Print a test page” link.
From the Control Panel interface, right-click a printer and select “Printer Properties.” Click the “Print Test Page” button.
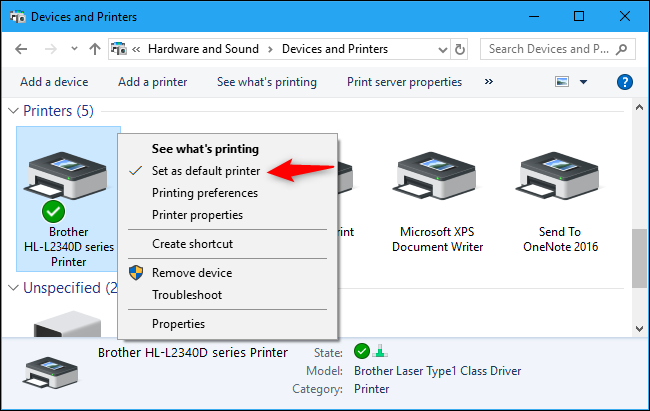
How to Set Your Default Printer
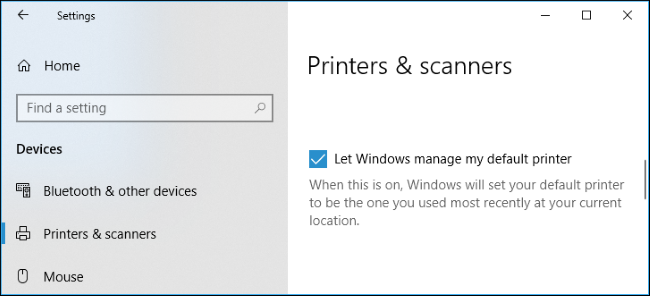
By default, Windows 10 automatically manages which printer is the default. It sets your default printer as the last printer you last printed to—in other words, whenever you select a printer and print to it, Windows 10 makes that your default printer.
To change this, head to Settings > Devices > Printers & Scanners and uncheck the “Let Windows manage my default printer” option.
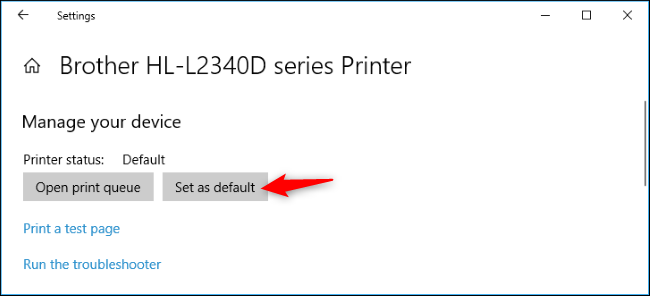
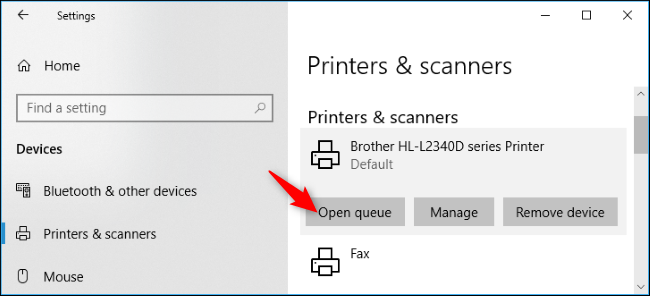
To choose your default printer, click a printer in the Printers & Scanners list, click “Manage,” and click the “Set as Default” button.
You can also right-click a printer in the Control Panel’s Devices and Printers window and select “Set as Default Printer” to set it as your default.
How to Manage Your Print Queue
Each printer on your system has a print queue. When you print a document, that print job is stored in the print queue before it’s sent to the printer and finishes printing.
In some cases, you may need to pause your print queue to temporarily cease printing, remove individual jobs from the print queue to cancel printing them, or check that everything has printed. You can do all this from the print queue window.
To open this, head to Settings > Devices > Printers & Scanners, click the printer for which you want to view the queue, and then click “Open Print Queue.” In the Control Panel interface, you can right-click a printer and select “See What’s Printing.” You might also see a printer icon in the notification area while printing; clicking the icon also opens the print queue.
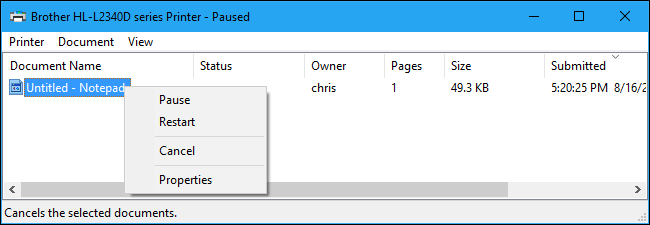
Each pending print job appears in the queue. If no documents are printing, the list will be empty. You can right-click a job to cancel, pause, or restart it. Sometimes print jobs can get “stuck,” and you may need to delete them and try again .
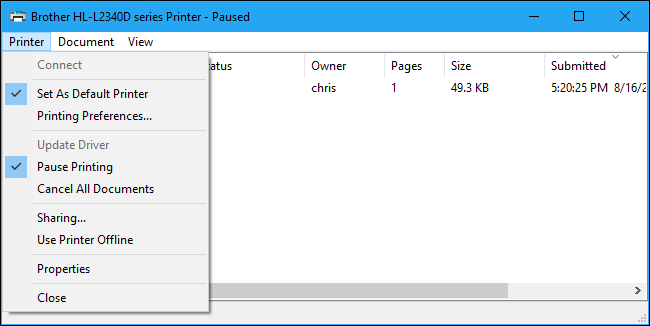
You can also click the Printer menu and use the various options to manage your entire queue. For example, you can click Printer > Pause Printing to temporarily pause all print jobs until you unpause them, or click Printer > Cancel All Documents to cancel all pending print jobs.
How to Create Multiple Printer Profiles
Normally, you must go into your printer’s preferences or properties to change various settings. However, this can be inconvenient when you have multiple groups of settings you want to toggle between. For example, perhaps you have a color printer on which you sometimes print high-quality color photos and sometimes print lower detail black and white documents.
Rather than toggling the settings back and forth every time you use the printer, you can add multiple printer devices that point at the same underlying physical printer . Think of these as multiple printer profiles you can select between while printing documents.
How to Set Up a Shared Printer
Windows 10’s April 2018 Update removed the HomeGroup feature , which was introduced in Windows 7 for sharing files and printers on a local network. However, it’s still possible to share printers on your local network.
This is primarily useful if you have a printer connected directly to your PC, but you want to print to it from other computers on your network. If you have a network printer that connects directly to your network via Wi-Fi or an Ethernet cable, this shouldn’t be necessary.
To share a printer , open the printer’s Properties dialog. To do so via the new interface, head to Settings > Devices > Printers & Scanners, click the printer’s name, click “Manage,” and then click “Printer Properties.” To do it in the old way, head to Control Panel > Hardware & Sound > Devices and Printers, right-click the printer, and then select “Printer Properties.” Click the “Sharing” tab, check the “Share this printer” option, and give the printer a name.
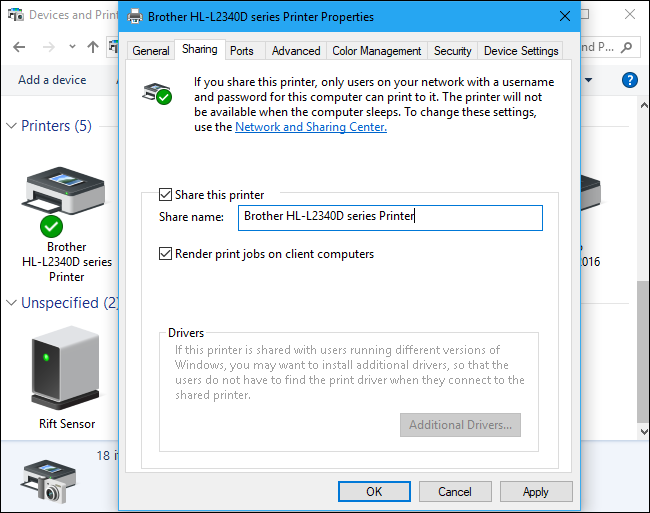
With the default settings, people on your local network can find the printer—but they’ll need the username and password of an account on your computer to connect to it. The printer should be automatically detected as an available printer in the normal Add Printer interface. Bear in mind that the printer won’t be available while your computer is asleep.
To share a printer over the Internet—for example, to print to your home printer when you’re away from home—set up Google Cloud Print .
How to Troubleshoot a Printer
If you’re having trouble with a printer, you might need to do some troubleshooting . The basics are pretty obvious: Make sure the printer is powered on and connected to your computer—or your Wi-Fi or Ethernet network, if it’s a network printer. Ensure the printer has enough paper and check if it has sufficient ink or toner. Ink and toner status may appear in the printer’s settings window, or you may have to view this information by reading a screen on the printer itself. You might also need to install printer drivers from your printer’s manufacturer.
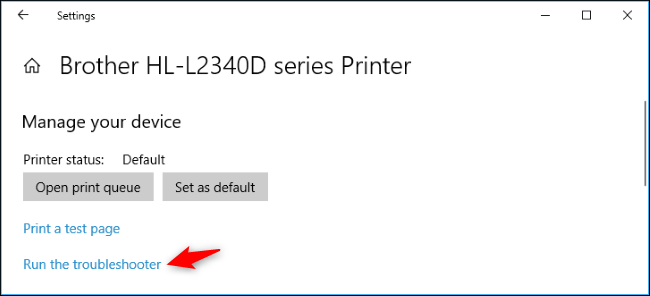
To troubleshoot the printer from within Windows 10, head to Settings > Devices > Printers and Scanners, click the printer, click “Manage,” and click “Run Troubleshooter.” You can also locate the printer in the Devices and Printers window in the Control Panel, right-click it, and select “Troubleshoot.”
The printer troubleshooter checks for a variety of issues that could cause printing problems on your PC and tried to fix any it finds.

If the printer has a built-in display, check the display to see if it’s reporting an error message. If you’re not sure what the error messages mean, try plugging them into a web search engine or looking them up in your printer’s manual.
You might also need to run various diagnostic functions on the printer itself. Check your printer’s manual for more information on its diagnostic features.
Also read:
- [New] 2024 Approved Top 10 YouTube Cameras, From Novices to Experts
- [Updated] 2024 Approved Google Meet Entry On Computers/Mobile Phones
- [Updated] Elevate View Count Prime Hashtags Strategy
- 2024 Approved Crafting Stunning Photography Mastering HDR Merging in Lightroom
- About Realme 12+ 5G FRP Bypass
- Beginner's Blueprint: Learning How to Navigate Pokémon Go Successfully
- Discover New Possibilities with Apple's iOS 18 Preview – The Five Must-Try Experiences!
- Discover These 16 Great Resources for FREE ASL Practice & Study
- In 2024, 10 Easy-to-Use FRP Bypass Tools for Unlocking Google Accounts On Lava Storm 5G
- Ordered List of Transformers Movies – How to Enjoy Them Properly
- Resolving the Missing libcurl.dll File: A Step-by-Step Guide
- Simple Methods for Snapping Photos of Your Desktop on an HP Computer
- Title: Mastering Printer Management on Windows 10: Step-by-Step Tips and Tricks
- Author: James
- Created at : 2025-01-03 16:38:53
- Updated at : 2025-01-04 16:58:12
- Link: https://technical-tips.techidaily.com/mastering-printer-management-on-windows-10-step-by-step-tips-and-tricks/
- License: This work is licensed under CC BY-NC-SA 4.0.